Understanding Porcelain Veneer Failures: What Every Patient Should Know
Porcelain veneers are among the most popular cosmetic dental treatments, with a 10-year survival rate of approximately 95.5%—an impressive statistic that gives most patients confidence. However, that statistic also means that roughly 4-5% of veneers fail or experience complications within a decade. For patients who find themselves dealing with a chipped, fractured, or debonded veneer, understanding what went wrong and how to move forward is essential.
This comprehensive guide explores the most common veneer complications, their underlying causes, evidence-based prevention strategies, and when professional intervention becomes critical.
How Common Are Veneer Complications?
The clinical literature provides a sobering but realistic picture of veneer longevity. While the majority of veneers perform well long-term, complications are more frequent than many patients realize:
Fracture and chipping represent the most prevalent complication, accounting for approximately 9.87% of total failures. What’s particularly important to understand is the timeline: while only 4% of veneers exhibit fractures at the 5-year mark, this increases substantially to 34% by the 10-year recall. Most fractures occur at the incisal edge or cervical third—areas where the remaining enamel is thinnest and most vulnerable to mechanical stress.
Debonding (veneer separation or “falling off”) ranks as the second most common failure, occurring in roughly 2-5% of cases within 10 years when proper cementation technique is followed. Critically, most debonding failures occur within the first 2 years after placement, suggesting that bonding errors during the initial placement are the primary culprit rather than gradual deterioration over time.
Secondary complications including secondary caries (tooth decay beneath the veneer), need for endodontic treatment, and marginal discoloration are less common but can significantly impact the longevity and appearance of your restoration.
Understanding these statistics is not meant to discourage you from pursuing veneer treatment—it’s meant to help you recognize risk factors and know when to seek professional help.
Why Do Porcelain Veneers Fracture?
Veneer fractures don’t happen by accident. Clinical research has identified specific, modifiable risk factors that dramatically increase fracture risk. Understanding these factors is the first step toward prevention.
Bruxism (Teeth Grinding): The Single Largest Risk Factor
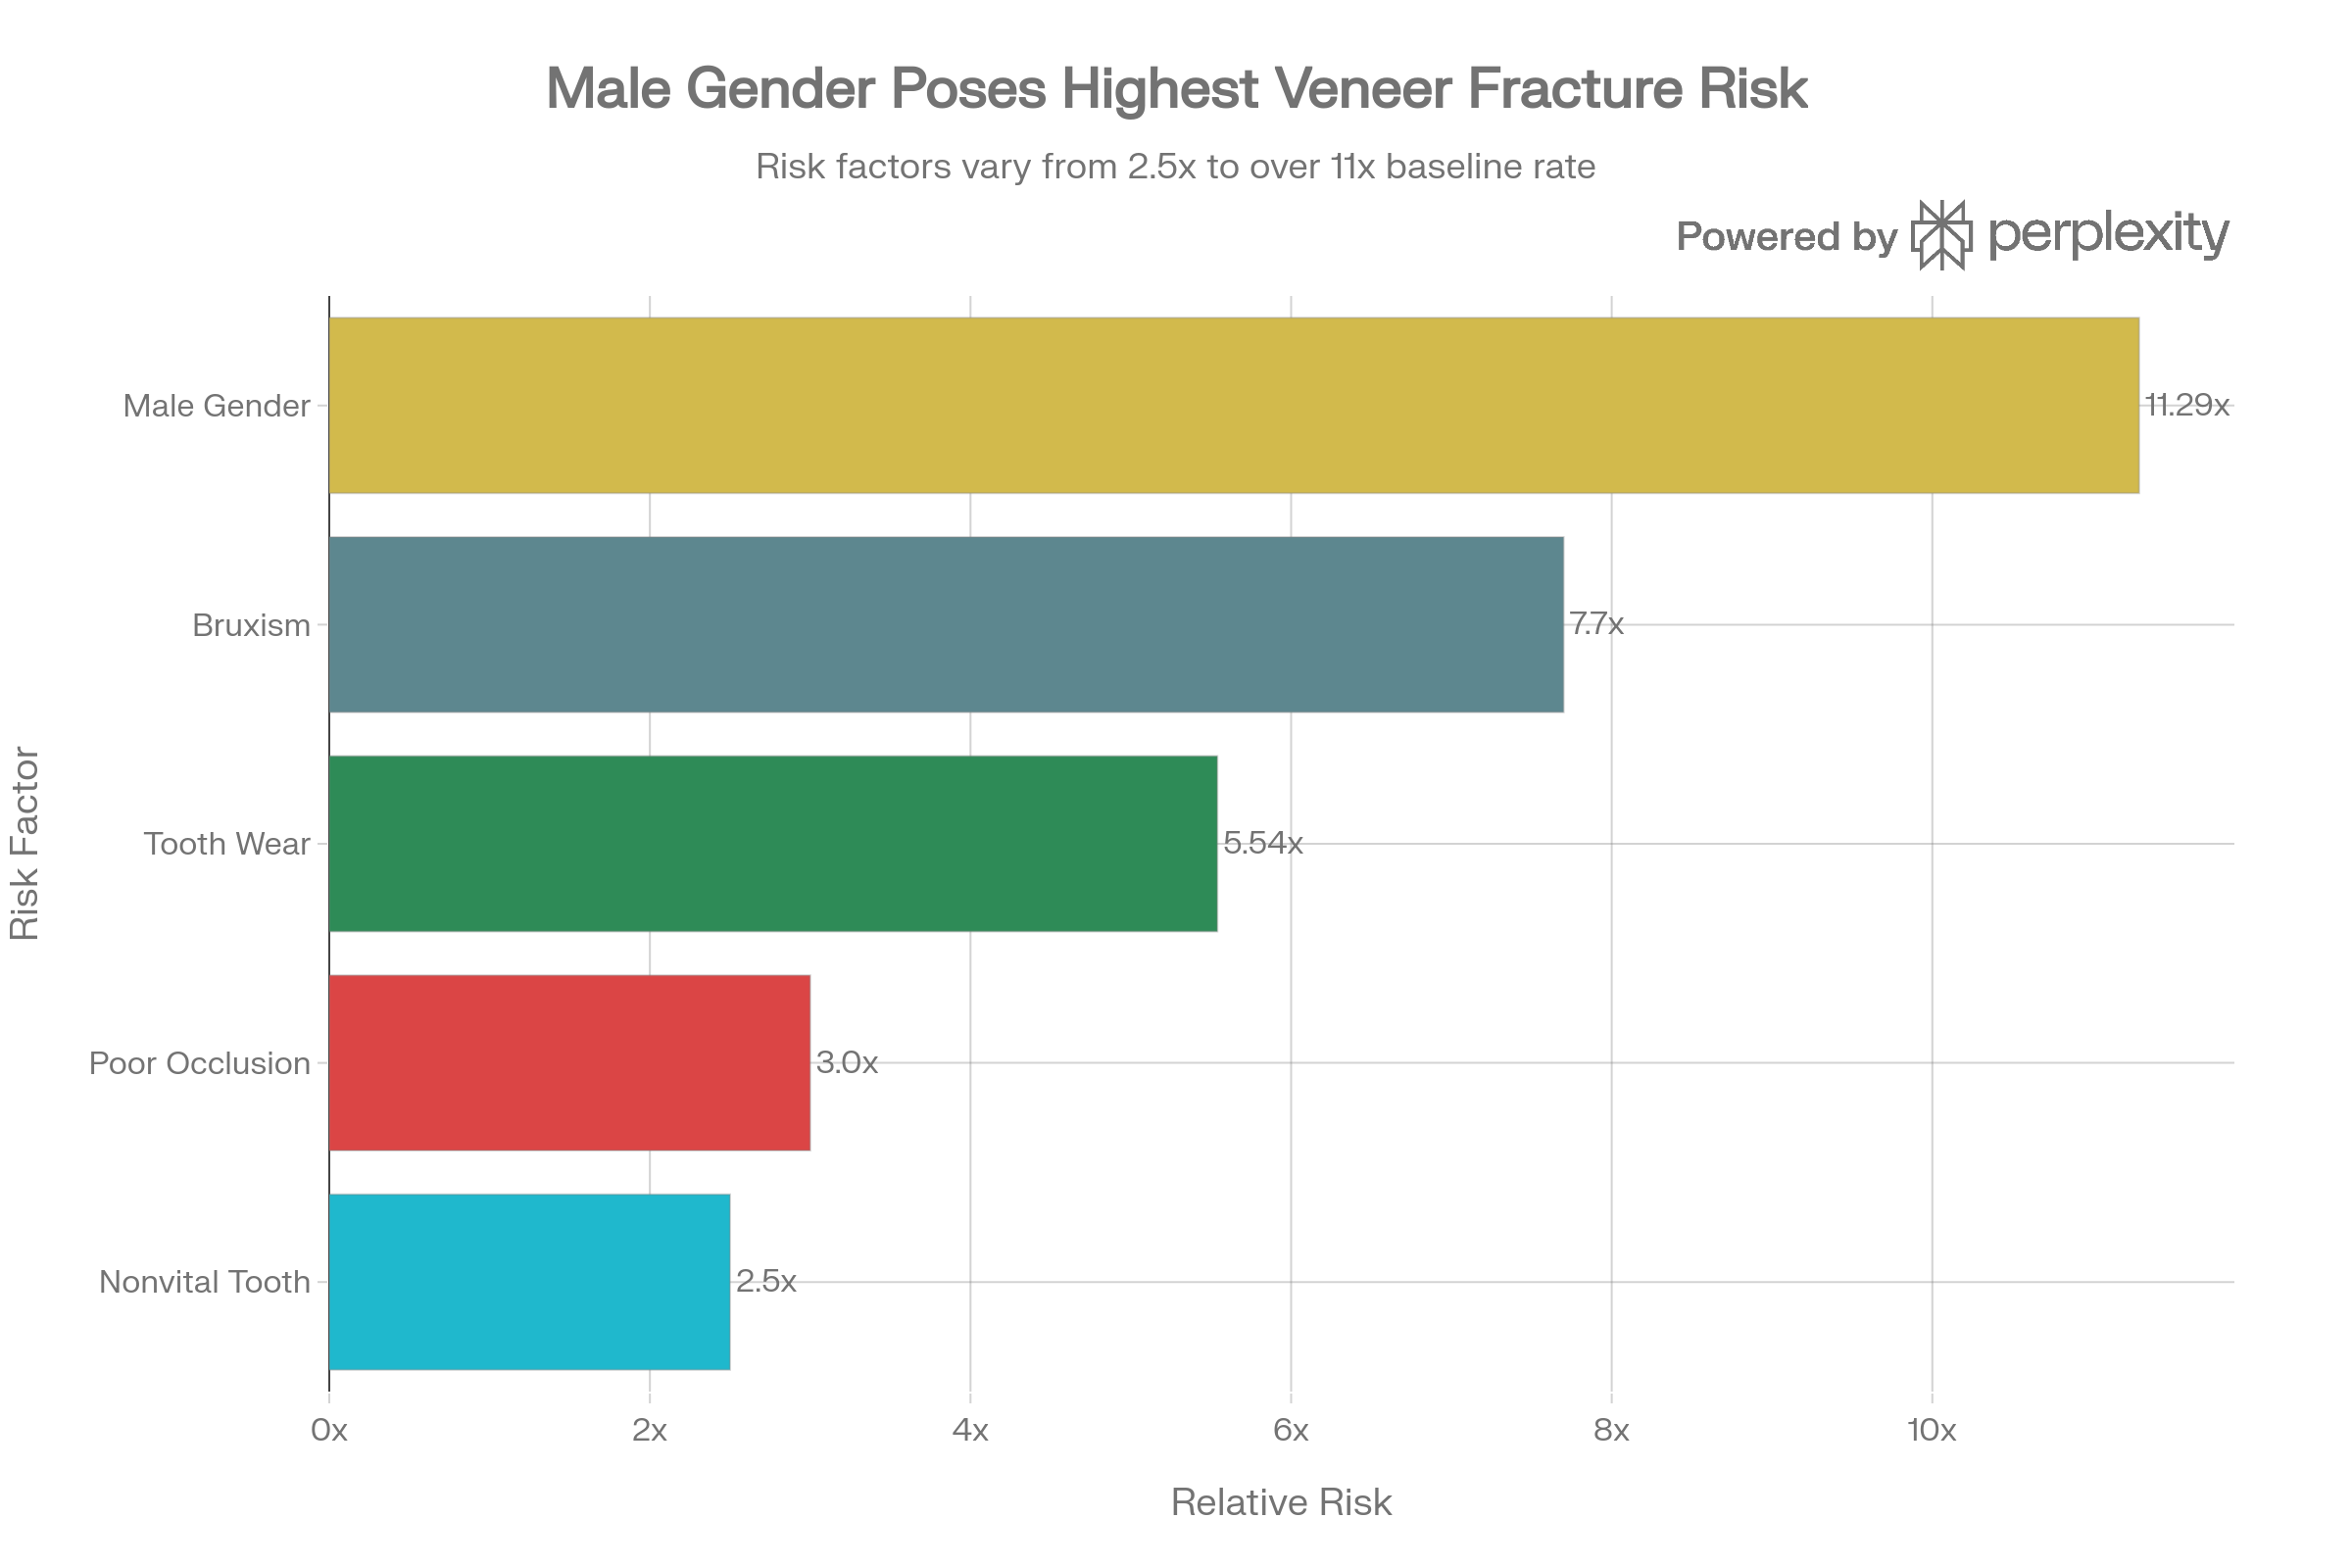
Teeth grinding during sleep, or bruxism, increases your failure risk by 7.7 times compared to patients without grinding habits. Some studies suggest bruxism can reduce overall veneer success rates by up to 60%.
Why is grinding so destructive? During sleep, your jaw muscles can generate bite forces significantly higher than normal eating forces. Veneers, while durable, are thin restorations (typically 0.3-0.5mm). When exposed to the grinding stress of bruxism night after night, these thin ceramics develop microfractures that eventually propagate into visible cracks or complete fractures.
The most common locations for bruxism-related fractures are the incisal (biting) edges and the cervical third of the veneer—precisely where the underlying tooth is already weakest due to thin enamel.
Red flag signs of bruxism:
- Waking with jaw soreness or tightness
- Worn or flattened natural teeth
- Partner reports audible grinding during sleep
- Morning headaches, particularly in the temple region
Occlusal Problems and Bite Misalignment
An improper bite—technically called malocclusion—creates uneven, concentrated stress on certain veneers. Post-placement occlusal discrepancies can increase veneer fracture risk by approximately 3-fold.
Common bite problems that increase risk include:
- Edge-to-edge bites: When front teeth meet in a precise edge-to-edge contact, they concentrate all biting force on a narrow ceramic area
- Lateral interferences: When the veneer contacts the opposing tooth during side-to-side jaw movements (lateral excursions), it experiences high shear stress
- Protrusive interferences: During forward jaw movement, if the veneer is the first contact point, repeated loading during speech and function creates stress concentration
Bite problems may be present before veneer placement or may develop afterward due to tooth shifting, loss of other teeth, or changes in jaw joint function.
Thin Veneer Construction and Poor Preparation
Research shows that veneers with a ceramic thickness to composite thickness ratio below 3 are at significantly higher risk for catastrophic fracture. Additionally, veneers prepared with minimal or no tooth removal actually demonstrate the highest survival rates, because more natural enamel is preserved to support the ceramic restoration.
Conversely, over-preparation—removing excessive tooth structure to create more “room” for the veneer—weakens the underlying tooth support and increases fracture risk. The paradox: more conservative preparation leads to more durable results.
Material Selection
The ceramic material matters significantly. Non-feldspathic porcelains (such as lithium disilicate and other modern ceramics) perform better than traditional feldspathic porcelain, with lower failure rates and superior fracture resistance.
Male Gender and Baseline Tooth Wear
Clinical studies reveal that male patients have an 11.29-fold increased risk of veneer fracture compared to female patients—though the exact biological reason remains unclear. Additionally, patients who exhibit signs of baseline tooth wear (from grinding, erosion, or prior trauma) before veneer placement have a 5.54-fold increased fracture risk.
Debonding: When Veneers Fall Off
If fracture is the most dramatic veneer failure, debonding is the most frustrating—because it involves no obvious damage to the veneer itself, yet the restoration simply separates from the tooth.
Debonding occurs when the bond between the ceramic veneer, the bonding resin, and the prepared tooth fails. While fracture often happens suddenly under high load, debonding can be progressive, starting with marginal gaps that gradually expand until the veneer detaches completely.
Primary Causes of Debonding
Contamination During Cementation
This is the single most preventable cause of debonding. Bonding resins form their strongest attachment when they contact clean, dry enamel or dentin. Even microscopic contamination with saliva, blood, or other fluids creates a barrier between the adhesive and the tooth surface, dramatically weakening the bond.
Specific contamination scenarios include:
- Saliva seeping under rubber dam isolation during cementation
- Bleeding from inflamed gingival tissues (gingivitis) before veneer placement
- Blood or tissue fluid from tooth preparation not adequately removed
- Residual temporary cement left on the tooth surface beneath the permanent veneer
- Forgotten retraction cords from the impression phase
Insufficient Enamel Preservation
The strength of veneer bonding depends almost entirely on the quality of enamel present for adhesive contact. Large preexisting composite restorations on the tooth mean less remaining enamel. Severe erosion (chemical dissolution of enamel from acidic exposures) further compromises bonding surface.
Poor Internal Surface Treatment of the Veneer
The internal surface of the ceramic veneer must be treated with an adhesive coating (usually hydrofluoric acid etch and silane primer) to create chemical adhesion with the bonding resin. If this preparation is inadequate or contaminated before veneer seating, the bond strength is severely compromised.
Bite Contamination from Gingivitis
Poor provisional (temporary) veneers left in place during the laboratory fabrication period can cause inflammation of the surrounding gum tissue. If these temporary veneers have rough margins or are too thick, they irritate the gingiva, leading to bleeding. When the permanent veneer is cemented just days later, this inflamed, bleeding gingival tissue contaminates the bonding interface during cementation.
Zirconia-Based Restorations
Zirconia veneers are purely polycrystalline ceramics with no glass phase, making chemical adhesion with resin cement extremely difficult. These restorations fail primarily through debonding rather than fracture, and their use for anterior esthetic veneers is generally discouraged for this reason.
Sensitivity After Veneer Placement: Understanding and Managing Discomfort
Most patients experience some tooth sensitivity in the days and weeks following veneer placement. Understanding what is normal versus what requires professional attention is critical.
Normal Post-Placement Sensitivity Timeline
Days 1-3: Mild discomfort or “zingers” (sharp, fleeting pain) when the tooth contacts cold stimuli is entirely expected. Teeth have undergone preparation, impression, and now have new restorations seated. Some sensitivity is a normal response.
Days 4-10: Symptoms typically begin diminishing as the pulp (nerve) settles and the periodontal ligament adapts to the new restoration.
By Day 14: The vast majority of patients report complete resolution of sensitivity and full adjustment to their new veneers.
When Sensitivity Signals a Problem
Persistent sensitivity beyond 2 weeks may indicate a clinical problem requiring professional evaluation:
- Inadequate bonding: If the veneer isn’t properly bonded, microscopic gaps allow oral fluids to penetrate toward the nerve
- Excessive enamel removal: Over-preparation exposes sensitive dentin, which cannot be desensitized by normal home care
- Poor veneer fit: Gaps or overhangs trap bacteria and create margins where irritants can reach the underlying tooth
- Bite problems: An aggressive contact when the veneer meets the opposing tooth can cause referred pain and persistent sensitivity
- Residual cement: Excess bonding resin or temporary cement beneath the margin creates inflammation and discomfort
Managing Sensitivity: Evidence-Based Home Care
Desensitizing toothpaste is the most effective first-line treatment. These products contain compounds (most commonly potassium nitrate or stannous fluoride) that block the fluid flow within the dentin tubules—the microscopic channels that carry sensation from the tooth surface to the nerve. Use these products twice daily for at least several days to allow the active ingredients to accumulate in the dentin.
Fluoride rinses and gels provide additional protection by remineralizing the surface and blocking dentinal sensitivity. Use an alcohol-free formula to avoid further irritation.
Dietary modification during the adjustment period is surprisingly effective. Avoid extremely hot, cold, acidic, or crunchy foods for the first 1-2 weeks. These stimuli can trigger sensitivity in compromised teeth. Opt for lukewarm, soft-textured meals—a simple measure that can dramatically improve comfort.
Proper brushing technique matters. Use a soft-bristled toothbrush and brush in gentle circular motions, avoiding aggressive scrubbing at the gum line. Hard-bristled brushes can further irritate sensitive teeth and damage the margins of your veneers.
If home care fails: After 2 weeks of consistent home care, if sensitivity persists, contact your dentist. Professional interventions may include veneer adjustment (smoothing uneven contacts), reapplication of bonding material to seal gaps, or occlusal adjustment to eliminate aggressive bite contacts.
Prevention Strategy #1: Nightguard Protection for Bruxism
If you grind or clench your teeth, a custom-fitted nightguard is the single most important preventive measure you can take to protect your veneers.
How Nightguards Protect Veneers
A nightguard works through three mechanisms:
- Separation: By keeping your upper and lower teeth separated by the guard material, direct veneer-to-opposing-tooth contact is prevented, eliminating the most destructive grinding scenario.
- Force absorption: The guard material absorbs the excessive bite force generated during grinding, distributing it over a broader area rather than concentrating it on thin ceramic veneers.
- Jaw muscle relaxation: By separating the teeth, nightguards prevent full jaw muscle contraction, reducing the maximum force your muscles can generate.
Choosing the Right Nightguard Type
Custom-fabricated hard acrylic guards are the gold standard for patients with significant bruxism. These guards, made from impressions of your teeth, provide maximum protection and durability. They last several years with proper care.
Dual-laminate guards offer a middle ground—the exterior is hard for durability, while the interior is softer for comfort. These suit patients with moderate grinding.
Soft guards provide comfort but are less durable and may not offer adequate protection for heavy bruxers. They work better for patients with mild clenching or TMJ sensitivity.
Over-the-counter guards are generally discouraged. These generic, boil-and-bite guards rarely achieve a precise fit and provide inconsistent protection.
Proper Nightguard Care and Use
- Clean gently with a soft toothbrush and non-abrasive toothpaste each morning; rinse thoroughly
- Never use hot water on your guard—heat can warp the acrylic
- Never chew or eat with the guard in place; this degrades the material
- Store in a clean, dry case after cleaning and drying
- Make it a bedtime ritual: Place the guard in immediately before sleep for consistency
- Replace when worn: Inspect regularly for damage, cracks, or poor fit; replace every 3-5 years or when visible wear develops
- Bring to dental visits: Show your dentist the guard at each checkup—excessive wear patterns indicate either heavy bruxism or an improperly fitting guard
Prevention Strategy #2: Occlusal Evaluation and Bite Optimization
Before placing veneers, your dentist should conduct a thorough occlusal analysis—checking how your teeth contact during biting in various positions (centric, protrusive, and lateral movements).
Critical Occlusal Assessment Points
- Centric relation contacts: When your jaw closes into its natural resting position, veneer contacts should be light and even
- Protrusive contacts: When your lower jaw moves forward (as in cutting food), the veneer should not be the initial or primary contact point
- Lateral contacts: During side-to-side grinding motions, the veneer should not experience high shear stress from premature contact
Misaligned contacts should be corrected during the veneer design phase, not discovered afterward. If your dentist doesn’t discuss your bite in detail before placing veneers, this is a red flag.
Post-Placement Occlusal Adjustment
Immediately after veneer cementation, your dentist should verify that contacts are correct and make fine adjustments. This isn’t an optional step—it’s a critical part of the procedure. Bite discrepancies should be corrected at the time of placement, not weeks later when you’re already experiencing discomfort.
The Question of Repair vs. Replacement
When a veneer develops a problem, the decision between repair and replacement has significant implications for cost, treatment time, and long-term outcomes.
When Repair Makes Sense
Repair is appropriate for:
- Minor chipping or small fractures not affecting structural integrity
- Localized staining not responsive to professional cleaning
- Marginal defects limited to one small area
- Early-stage sensitivity requiring bonding adjustment
Repair preserves tooth structure (you don’t need to re-prepare the tooth) and costs less than replacement. It’s the conservative, reversible option.
When Replacement is Necessary
Replacement is the better choice when:
- The fracture is extensive, affecting more than 30-40% of the veneer
- Debonding has occurred (the bond has failed; repair won’t restore strength)
- Secondary caries (decay) exists beneath the veneer
- Open or defective margins cannot be sealed adequately with repair
- The veneer has weakened from multiple prior repairs
- Bite problems or tooth shifting requires alteration of veneer design
The decision ultimately depends on the severity of damage, the condition of the underlying tooth, and your dentist’s clinical judgment about how likely a repair is to succeed long-term.
Safe Veneer Removal: Er:YAG Laser Debonding
If your veneer fails or requires replacement, removal must be done carefully to preserve the underlying tooth structure. This is where modern laser technology offers significant advantages over traditional mechanical removal.
Why Traditional Mechanical Removal Is Problematic
Conventional veneer removal involves grinding away the ceramic with a dental bur. While effective, this method is:
- Time-consuming (often 10-15 minutes per veneer)
- Uncomfortable for the patient due to heat and vibration
- Potentially damaging to underlying enamel and dentin
- Unpredictable—there’s always risk of damaging the underlying tooth structure
Er:YAG Laser Debonding: The Modern Standard
The Er:YAG laser has revolutionized safe veneer removal. This specific wavelength of laser energy transmits through the ceramic veneer and is absorbed by the bonding resin cement beneath, softening it and allowing the veneer to separate cleanly.
Key advantages:
- Safe temperature rise: Laser debonding raises pulp temperature by less than 5.5°C (the safe threshold is 58°C). Proper technique with air-water cooling ensures minimal thermal risk to the nerve.
- Fast: Average removal time is 100-113 seconds per veneer
- Preserves tooth structure: The debonding occurs at the cement-veneer interface, leaving the underlying tooth completely intact
- Painless: Minimal patient discomfort compared to mechanical methods
- Preserves veneer: If the veneer is salvageable, it can often be carefully removed intact
Optimal laser parameters:
- Energy: 133 mJ per pulse
- Frequency: 10 Hz
- Distance: 3-6mm from veneer surface
- Always use air-water cooling spray
- Margins irradiated first (avoiding thin cervical areas)
If your dentist doesn’t have Er:YAG laser capability, ask whether they’ll refer you to a specialist for removal or what precautions they’re taking with mechanical removal to protect your tooth.
Post-Removal Aftercare: What to Expect
After veneer removal, your underlying tooth is now exposed—and often sensitive or tender.
Immediate post-removal period:
- Some tenderness, sensitivity, and mild swelling is normal
- Over-the-counter pain relievers (ibuprofen, acetaminophen) help manage discomfort
- Avoid chewing on the exposed side for several days
Dietary modifications:
- Skip hard, crunchy, sticky, or acidic foods for at least one week
- Avoid very hot or very cold foods and beverages
- Opt for soft, lukewarm foods (soups, yogurt, soft fruits)
Oral hygiene:
- Continue regular brushing and flossing, but be extra gentle around the treated tooth
- Rinse with warm salt water 2-3 times daily to reduce inflammation and promote healing
- Avoid aggressive flossing at the treatment site for 3-4 days
Temporary protection:
- Over-the-counter temporary dental cement (available at pharmacies) can temporarily protect the exposed tooth if sensitivity is severe
- This provides temporary relief while you arrange permanent restoration
When to call your dentist:
- If pain is severe or worsening after the first 48 hours
- If swelling increases significantly
- If you develop signs of infection (fever, pus, severe swelling)
- If sensitivity is unbearable despite home care
Red Flags: When to Contact Your Dentist Immediately
Not all veneer problems require emergency treatment, but certain signs warrant prompt professional attention:
- Severe pain unresponsive to over-the-counter medication or home care
- Persistent swelling of the gum tissue around the veneer
- Bleeding from the gum line that doesn’t improve with gentle brushing
- Visible decay or discoloration beneath the veneer margin
- Mobility of the veneer or feeling that it might fall off
- Bite pain—pain specifically when biting down, suggesting an occlusal problem
- Extended sensitivity beyond 2 weeks post-placement despite home care
- Fracture lines across the veneer
- Veneer debonding (partial or complete separation)
- Signs of infection—fever, swelling, or pus drainage
These aren’t situations to wait out. Early intervention often prevents minor problems from becoming major ones.
Emergency Protocol: Your Veneer Fell Off
If your veneer becomes completely debonded and detaches:
- Rinse your mouth gently with warm water to remove debris and assess the situation
- Inspect the veneer: If it’s intact and undamaged, this is fortunate—it may be re-bondable
- Store safely: Place the veneer in a small container with a moistened paper towel to prevent it from drying out (drying can compromise the internal surface)
- Protect the exposed tooth:
- Avoid chewing on that side
- Skip hard, sticky, and acidic foods
- Use temporary dental cement (drugstore product) if sensitivity is severe
- Contact your dentist immediately—same day if possible. A debonded veneer should be evaluated and re-cemented or replaced within 24-48 hours, as the exposed tooth is vulnerable to decay
- Do not attempt to reattach using superglue, epoxy, or any non-dental adhesive—this will contaminate the veneer and tooth and make professional repair more difficult
Prognosis and Long-Term Outcomes
The good news: modern dental techniques and materials have made veneers highly predictable and durable. With proper case selection, meticulous placement technique, appropriate bite correction, and patient diligence with nightguards and oral hygiene, the vast majority of patients achieve excellent long-term results.
The 95.5% 10-year survival rate cited in clinical research reflects typical practice. With ideal conditions—minimal tooth preparation, non-feldspathic ceramic, excellent bonding technique, absence of bruxism (or aggressive nightguard use), and proper occlusal management—survival rates of 98%+ are achievable.
Complications, when they do occur, are highly manageable with modern techniques. Even debonded or fractured veneers can be addressed through repair, replacement, or alternate restorative approaches without compromising your overall dental health.
The Bottom Line
Porcelain veneers remain one of the most successful esthetic treatments in dentistry. However, they are not indestructible, and understanding potential complications empowers you to take preventive action and recognize warning signs early.
Key takeaways:
- Bruxism is the single largest preventable risk factor; if you grind your teeth, wear a custom nightguard
- Bite problems should be identified and corrected before veneer placement
- Sensitivity beyond 2 weeks warrants professional evaluation
- Early intervention prevents minor complications from becoming major ones
- Modern removal techniques (Er:YAG laser) make replacement safe and predictable
Work with a dentist who spends time discussing your risk factors, evaluates your bite thoroughly, and explains your preventive options. This partnership—combined with your diligence in nightguard use and home care—creates the ideal conditions for veneer success.
References & Clinical Evidence
This article is based on peer-reviewed clinical studies and systematic reviews including:
- Clinical Survival Rate and Laboratory Failure of Dental Veneers (2024)
- Long-Term Survival and Complication Rates of Porcelain Laminate Veneers: Systematic Review (2021)
- Clinical Performance of Porcelain Laminate Veneers (10-year studies)
- Er:YAG Laser Debonding Studies and Safety Data
- Risk Factor Analysis Studies on Veneer Fracture and Debonding
This content is for educational purposes and should not replace professional dental consultation. Always consult with your dentist regarding your specific situation.